How to Setup Contact Form 7?
If you have a website, I am sure you want to have engagement with your visitors. Contact form is the best way for your visitor to send you feedback or comments. You can easily setup a contact form in WordPress by simply install a plugin. There are many contact form plugins available out there and Contact Form 7 is the most popular and oldest plugin. However, Contact Form 7 is not really user friendly. Many people don’t know how to setup Contact Form 7, especially for beginners.
I have gone through that process and today I am here to share with you on how to setup Contact Form 7. I still remember when I first use Contact Form 7, I was so busy in finding and reading tutorial online. In fact, it is not very difficult but it can be confusing if do not know the right way.
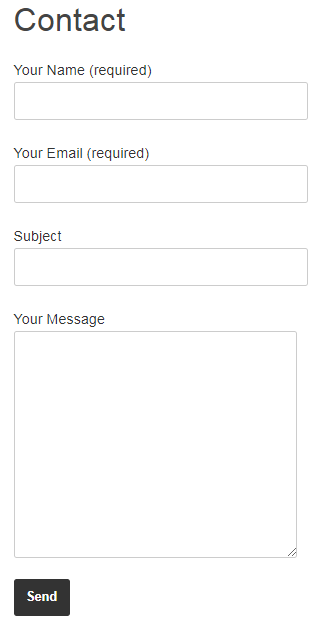
In this article, I will be showing the steps to create a simple contact form. Below is the screenshot of the contact form you will be creating.
Install Contact Form 7 Plugin
You can easily install Contact Form 7 plugin in your WordPress back office portal.
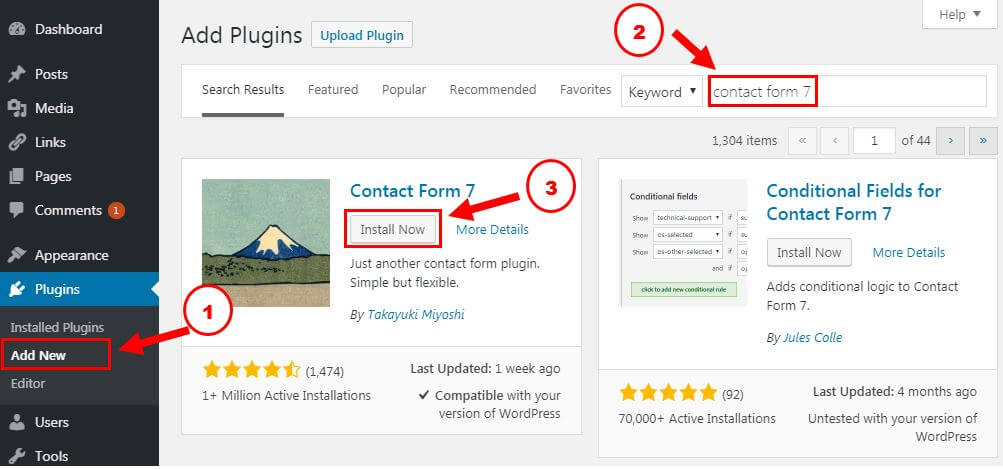
- First, login to your WordPress back office and goto Plugins > Add New.
- Enter “Contact Form 7” in the search box to search.
- From the search result section you see the Contact Form 7 in the list. Click “Install” button to proceed. Once installation done, click the “Activate” button to activate the plugin and you are done.
Now, you can move on to next step to create your contact form.
Create Contact Form
From the side menu, you should be able to see the link “Contact”. Hover over the link and click on “Add New” to create a new contact form.
A simple contact form template is created for you by default. However, you may notice that the template is full of syntax codes. This is the scary part to most of the people especially those who are not IT savvy. Don’t worry, I will explain it to you in this article.
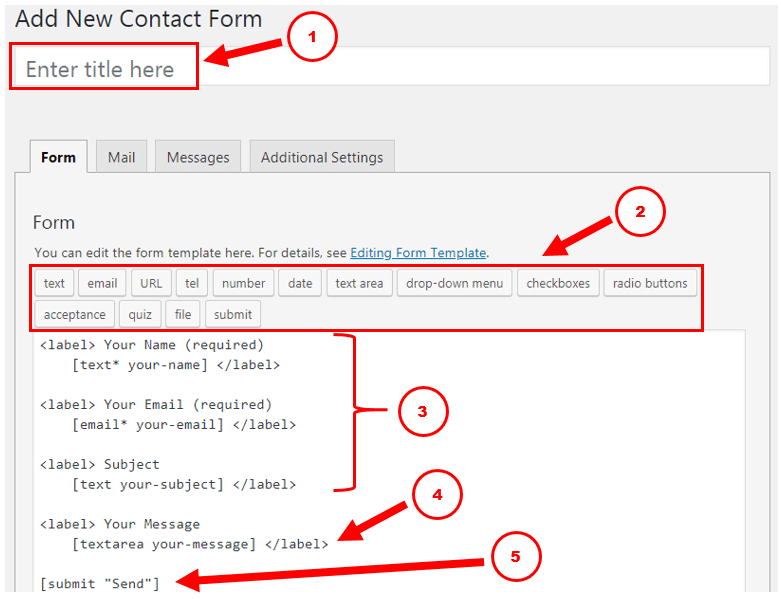
Below is the place where you create your contact form.
- First thing first, enter a title for your contact form. For example, you can simply name it as “My first contact form”.
- You will be seeing many buttons at the top of the form creation header area. These buttons are the attribute of your contact form, we call it form-tag. In our case, we will be using “text”, “text area”, “submit” and “acceptance” only.
- For name, email address and subject line, we will be using the “text” form-tag. It is a single line text input field.
- We will be using “text area” form-tag for Message. It is a multi-line text input field.
- Lastly, “submit” is a submit button form-tag.
All your fields description should be placed in between <label></label> tags.
In addition to the fields we create above, I will show you how to add a GDPR agreement checkbox as below.

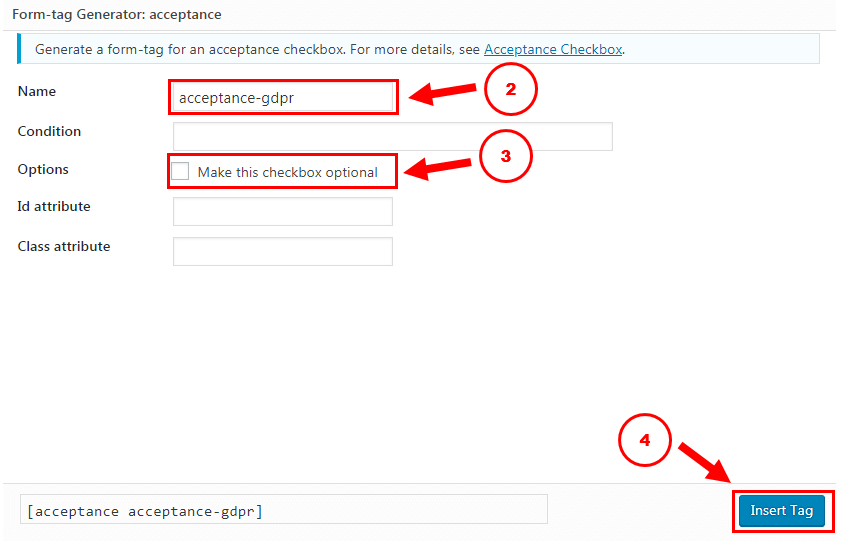
- Click the “acceptance” button from the top menu.
- Enter a form-tag name as “acceptance-gdpr”.
- Make sure the “Make this checkbox optional” options checkbox is uncheck.
- Lastly, click “Insert Tag” button to insert the checkbox into your contact form.
- You should see the following syntax as the result.

Note: Sorry, I forgot to mention that you need to put a description for your GDPR agreement checkbox in between the <label></label> tags.
Email Configuration
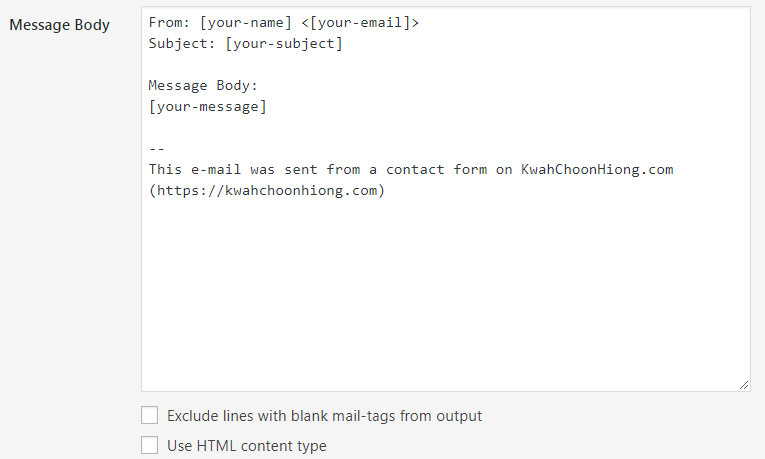
In this step, you will be configuring the email setting so that you could receive message from your visitors via the contact form.
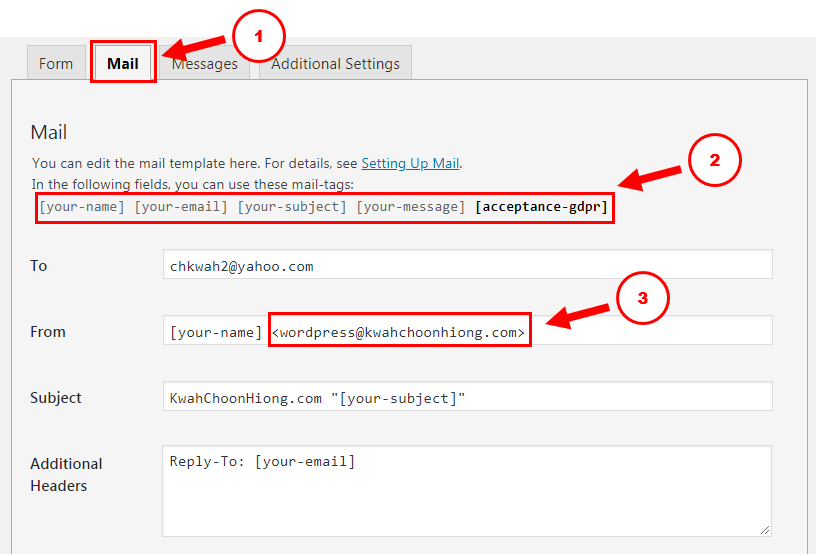
- Click on “Mail” tab. This will bring you to the mail template.
- All fields that you created earlier in the contact form will be available as mail-tags for your mail configuration. You can put the mail-tag you want in the email so that it will be sent to your mail box.
- Please pay attention to the “From” configuration. You should configure it as wordpress@yourdomainname.com. For instance, my website domain name is kwahchoonhiong.com so I put it as wordpress@kwahchoonhiong.com. If you put other email address, very high chance you will not receive the email from your contact form.
- Lastly, click “Save” to save your configuration.
Add Contact Form to Page
Now, you are ready to put your contact form into action. To do this, you will need to create a contact page to add in your contact form shortcode.
What is a shortcode?
A shortcode is a WordPress-specific code that lets you do nifty things with very little effort. Shortcodes can embed files or create objects that would normally require lots of complicated, ugly code in just one line. Shortcode = shortcut.
WordPress.com
Below are the steps to add your contact form to a page.
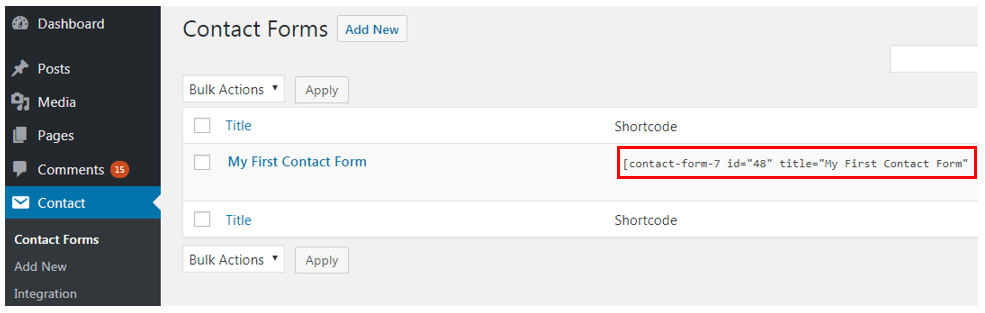
Firstly, get the shortcode of your contact form. Simply go to Contact > Contact Forms and copy the shortcode.
Now, create a page and name it as “Contact”. You can do this by going to Pages > Add New. Enter “Contact” as the title.

Enter the shortcode as a new paragraph. You can preview your contact form with the “Preview” button. If everything ok, click the “Publish” button to publish your contact page.
Test Your Contact Form
You must always test your contact form to make sure it works. I am sure you don’t want to miss any message from your readers.
To test your contact form, simply go to your contact form and fill out all the fields and click submit.
If everything working fine, you should receive an email similar to the below one.

Conclusion
Contact form is an important element you must have in your website to engage with your readers. If you are into the internet marketing, contact form is extremely important. There are many WordPress form builder plugins available in the market. Contact form 7 is one of the most popular oldest WordPress contact form plugins around.
Despite its popularity, many people are still struggle with how to setup Contact Form 7. This is because Contact Form 7 is not really graphical user friend. Largely of the configuration are syntax base. I hope my article could help you with how to setup Contact Form 7.
To Your Success,
Kwah Choon Hiong